

Painting and detailing a 3D Printed (FDM) PLA model
A personal journey and guide into some lessons learned and tricks you can use at home when detailing and cleaning up your next print.
3D printing has been around for many more years than we realise. Dating as far back as 1981 when Hideo Kodama of Nagoya Municipal Industrial Research Institute first developed the first functional "rapid prototyping system" which used "photopolymers" (which changed over the years to become, what we know now as "Resin UV Printing").
This is my journey through the printing, prepping and painting process of my 3D Printed mask of a video game from late 2019 (Directed by Hideo Kojima) called Death Stranding, and its main antagonist (more so particularly his mask) Higgs Monaghan.
(you can find out more about the game and its characters here https://deathstrandingpc.505games.com/)
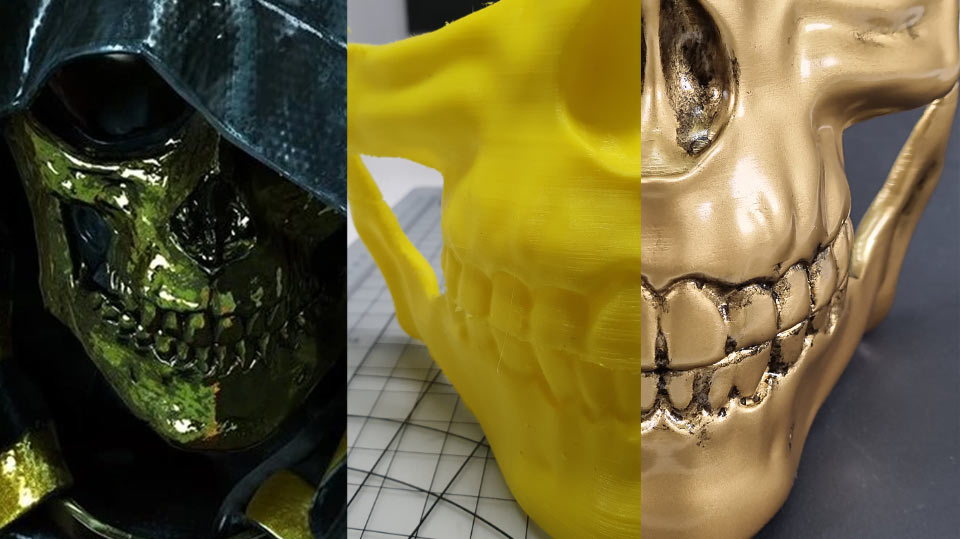
So first up i would like to answer a question "Why did you pick this mask in particular?". Well in the context of the game it is quite the stand out asset/item. Its hard not to explain in depth why it's so integral to the entire story as it ties in to an outlier of many cross-intersecting references in the game too (as is typical with a well crafted Kojima game...I'm not biased...ok...maybe a little). But to cut to the point it is a powerful tool for the villain to utilise in the game summoning enemies and creating his own monsters and his connection to a place/alternate dimension known as "The Beach" and the enemies he summons are black semi-transparent or completely clear enemies called "Beached Things" or "BT's".
ANYWAY! That is what inspired me to make this mysterious and intriguing model as the game itself is a Marvelous (yet very slow burn) story as a whole. So Lets get into it, now that the context is out of the way ha ha. So first up I can't full take credit for the print, it's me and a good friend of mine who printed it, we did the main print in basic PLA (yellow), with a Creality CR10 - FDM Printer (with a few modifications like a full heated tip/nozzle for different material prints etc). We used Cura V.4.5 at its "Fine" quality setting with some customised layer height settings, and z-step modifications as well.
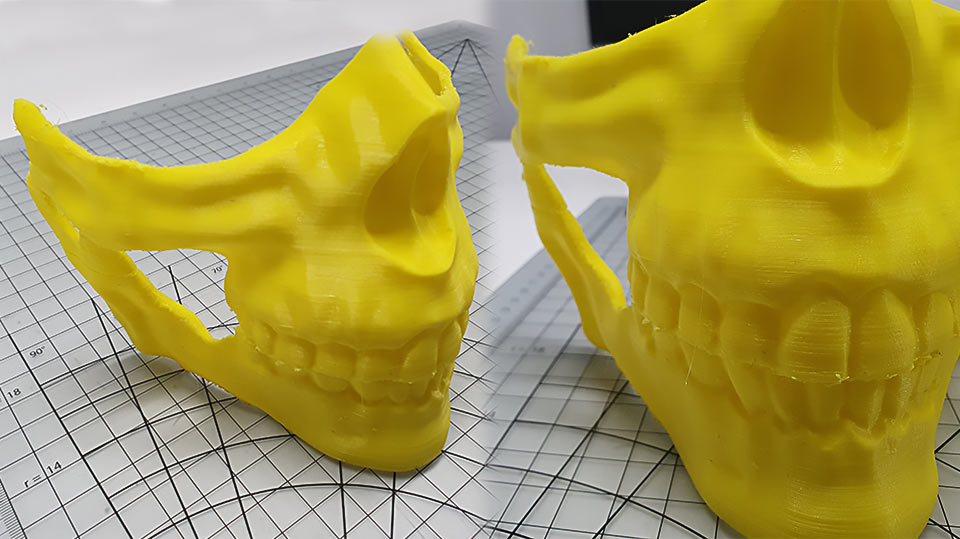
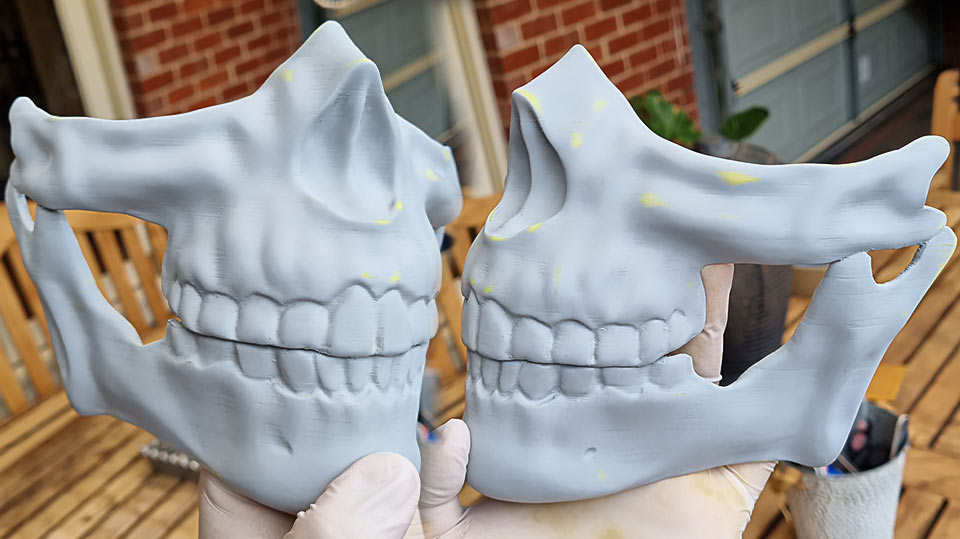
You can note that the there was still some noticeable webbing left from the nozzle crossing over each layer back and forth, the above image is an example of the raw initial print. I then went ahead to scrape and clean what I could with my Excel K1 Hobby Knife Pack, making sure to try and clean up as many initial print globs, webbing, nicks and bumps that I could before moving onto the rough sanding stage. This is where the cutting tools of the hobby type really come into play.
There was also a split on the top of the right jaw which is also known as "layer separation" in 3D printing terms. This can happen where the layers (during printing) either, did not connect or fell out of temporary alignment and didn't adhere to one another. Most of the time this shouldn't happen, but in the odd situation here or there this can occur.
However this little split was easily rectified thanks to the amazing ZAP 0.25oz. Green Zap-A-Gap Medium CA+, this adhesive is an absolute beast its gluing power is immense and not to mention dangerous if not very carefully handled, so make sure to wear gloves and if possible also wear protective glasses, and open it away from your face. It dries clear and fast, making the initial contact activate within 30 seconds, although to ensure adhesion I then attached an elastic band around the jaw to hold it in place as it cured over night.
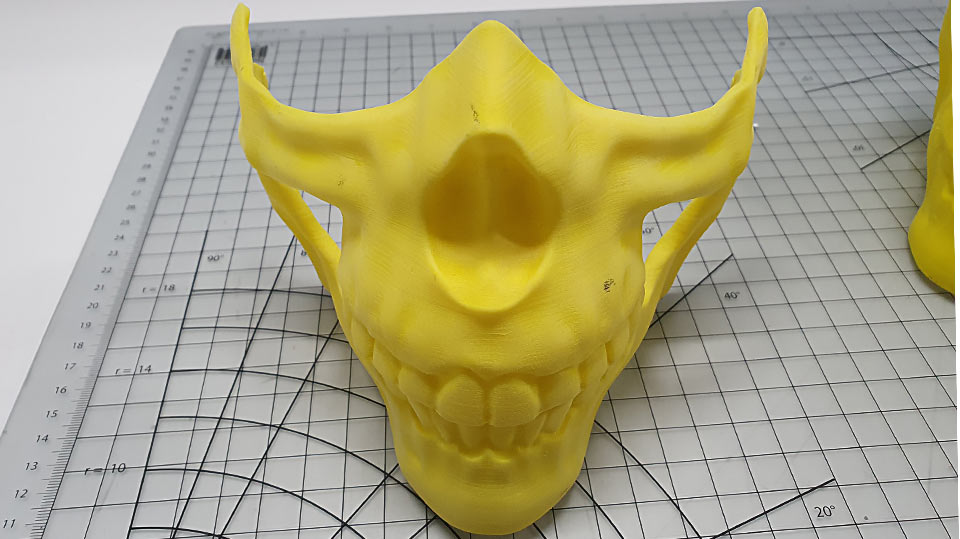
The next step was the sanding of the surface to try smoothing out and cleaning up the print lines so they were more cohesive and flat. I used a very rough orbital sander pad to smooth the lines out and rough up the surface (roughly 100-150 grit). This further assists in the primer painting stage so the primer self leveling will eliminate most of if not all left over print lines. This will also ensure that the primer will attach to the mask, otherwise the glossy PLA will not allow proper adhesion of the primer to the mask (this was also mentioned in our previous blog about "Working with Colours with Scale 75 Acrylic Paints").
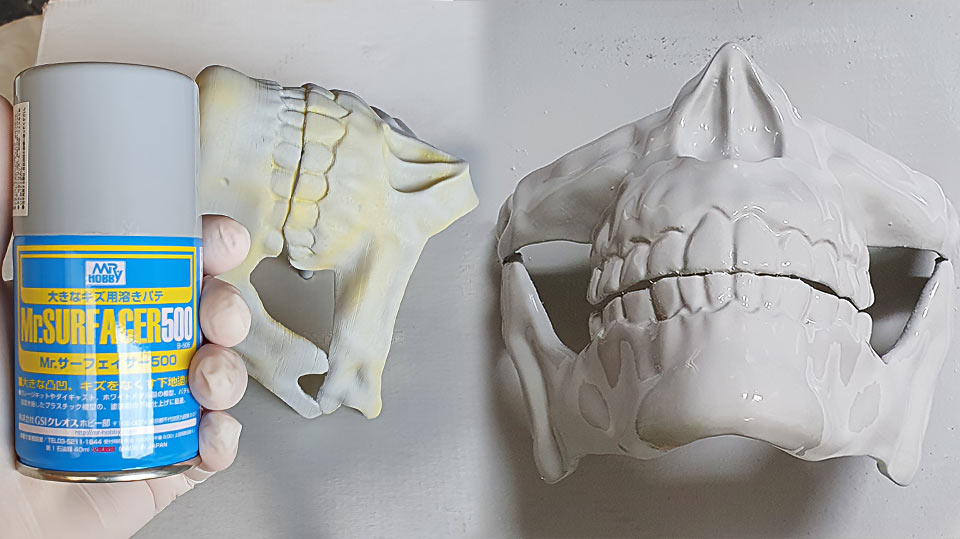
Its at this point when I began the primer dusting and full application of the leveling primer in particular the MR HOBBY Mr Surfacer 500 Spray. I started by dusting on a light layer first to act as an adhesive base for the next layer. Allowing for 15 minutes flash time before continuing on to the far more heavier application of primer. With the goal in mind to make full utilisation of the primers self leveling features to smooth out as many of the left over print lines from the rough sanding stage as possible.
Usually I try to avoid only 2 layers and go for 4-5 layers instead, gradually increasing in application amounts each time. But this shorter route seems to have worked well too, (although to be fair previous times I used primer and paints, they were done using Car primer and 2 Pack paint instead of hobby based paints and primers).
Next up, after 24 hours of curing and setting time, it was onto SANDING and refinement, to further smooth out any left over print lines that I could see (forgoing the dark paint fleck trick which you might occasionally use to properly see the "high's, lows and imperfections" left in the primer). Although in the same context, not all skulls/bones are 100% clean and tend to organically contain defects, so in this case, the left over print lines add a bit more character and realism to to the mask.
This was where I used the GODHANDS Kamiyasu-Sanding Stick 2mm-Assortment Set A, this was my first forray into using Godhand personally, and wow has it changed my life! The flexibility of the sanding foam pads that are supplied are just the right size for fine sanding/detailed fixes, and it bends to fit every curve so easily, it is far more controllable than using standard sanding pads that you could buy in a warehouse.
In addition to really force the sanding foam pads to fit into tight crevices, I used a pack of NINESTEPS tools, particularly the NINESTEP Gizmo Tool Set, the plastic picks mainly, one for holding the mask up off the cardboard box I was spraying onto, and another for the SANDING pads as mentioned before.
At some points I had to sand the PRIMER down nearly back to the PLA itself, but that's a given when working with 3D Printed models. So don't be scared to sand back that far if need be, and if you want you can always add some further layers of primer back onto it to refine it once again.
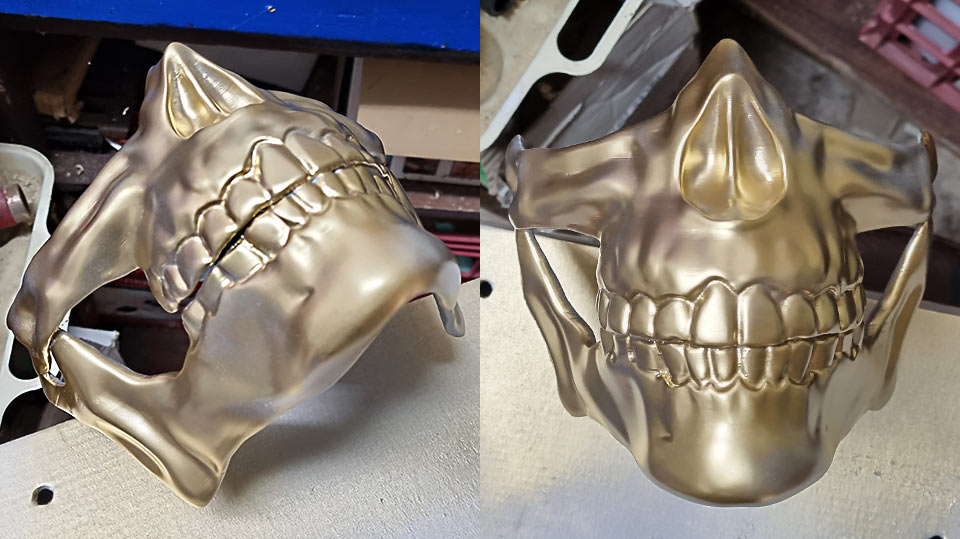
Now came probably my most favourite part of this whole venture, adding the PAINT to the PRIMER (after cleaning it of any leftover dust and rinsing any excess off with clean water while wearing my gloves). Just like the PRIMER base, I follow the same principle, applying a light dusting of the TAMIYA TS-21 GOLD first to create a contact base, leaving it to cure for 15 minutes so it tacks on well, then applying a second more thicker layer, leaving it again for 15 minutes. However this time I applied a third, even thicker layer, which I took more time in applying, and doing so quite liberally as to make sure that the paint was applied thoroughly and filling in every spot.
My reasoning for a thick application of the paint is:
1. Improved protection all around
2. Guarantee of pure colour output
3. Further filling of print lines
4. ...because I can 😜
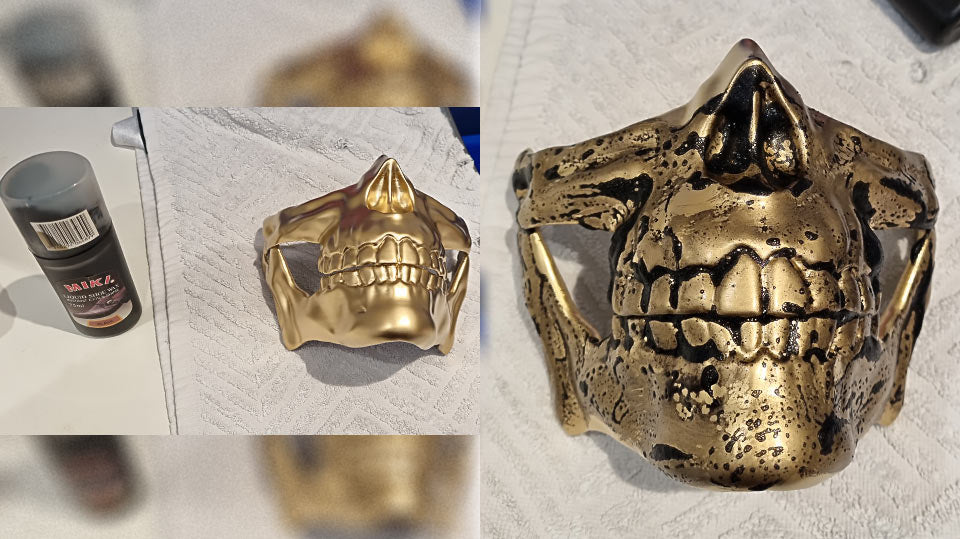
This next step is something that a fair few hobbyists might know of, and for others might come as a bit of a surprise. I used black shoe polish to bring out some finer definitions in the masks design, accentuating some of the models imperfections further, while also matching the original reference images from the game more closely.
You do so by applying a moderate layer of shoe polish directly to the paint (no sanding this time), and with a very damp paper towel, or cloth, you wet WASH off the excess, until you are happy with whats left, making spot adjustments as you go. Usually only ever applying it where you know you want the details to really show. It is critical at this point though that you make sure to properly clean up the parts which you just washed with a fresh damp towel or paper, otherwise you will get streaking of the polish left over, unless that is your intended goal.
Now this may be seen as a quick-fix solution compared to using WASHES (or a way of achieving a "comic book" cell shaded style) and is definitely not the only way you can do shading. As BJ explains in our previous blog ("Working with Colours with Scale 75 Acrylic Paints"), you can also use THINNERS with types of matching paints to create a WASH as well, whether you want to use BRUSHES, sponges or AIRBRUSHES even to apply this, is entirely up to you. I consider this way kind of like a "poor mans" wash solution, metaphorically speaking.
Nearly towards the end here~
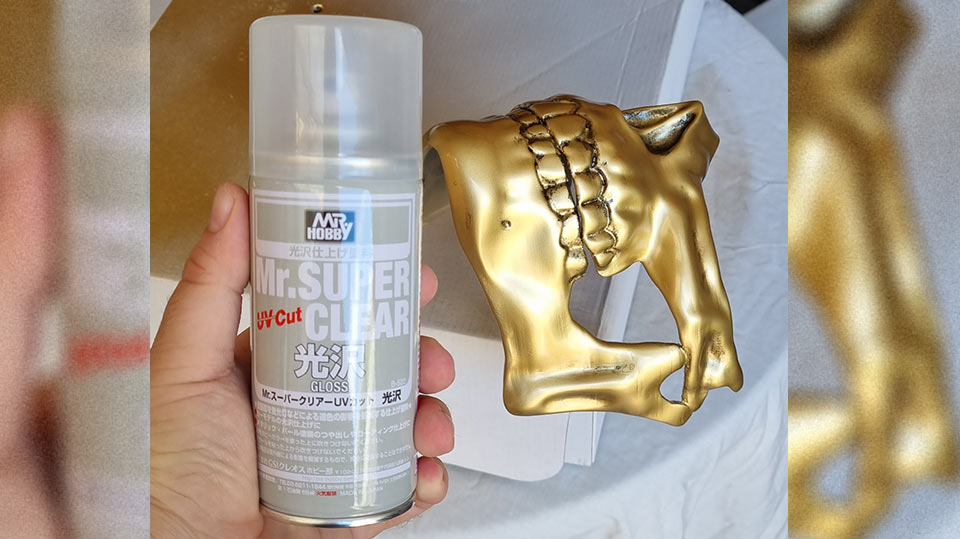
Lastly is the application of the clear-coat, after a further 24 hours curing time for the PAINT (ensuring it isn't tacky or still sticky to the touch), it was time to bring it all together and give that glossy finish. Although the TAMIYA paint itself was fairly glossy, it still had a kind of sating finish which wasn't exactly what I was after. This is where the MR HOBBY Mr Super Clear UV Cut Gloss Spray comes in.
This amazing can worked absolute wonders, the clear coat goes down so clean, it even settles so smoothly that it feels like the clear was polished afterwards. The sheen isn't too overly stated either (although that is due to me only applying 2 layers of clear to the mask, same as last time, applying only a light spray followed by a heavier application), but it works well with the overall aesthetic of the masks design.

3D Mask Finished Product

Death Stranding - In Game Mask Example
(Image Copyright - Kojima Productions, 505 Games, and Sony Interactive Entertainment America & Japan)
hidden/removed under multiple sanding pass-overs, layers of primer applied, and layers of paint as well. You can't really count the clear coat as a layer, as the name suggests it is more so a gloss overlay, and extra protective layer that is transparent and adds a sheen.
So irregardless, it will still show the lines to the naked eye, but when you check them under a lights reflection, they should not show. All in all this was a very eye opening experience for me and I feel like I have gained a lot of knowledge about this from BJ, Warwick and Nathan as I went through this. In addition it only further proves to me that car (2 pack) PAINT and PRIMER is not the most ideal for these kinds of applications. Car PAINT and PRIMER is more touchy and requires way more attention and babying in a way, where as hobby PAINT and PRIMER (at least these ones I have tried) are a lot more forgiving for the user.
So this was my journey and walk through of how I painted, and detailed my 3D Printed skull mask or "Chiralium Skull Mask" from Death Stranding, that Higgs uses.
If you would like to see Hearns Hobbies entire range of Hobby PAINT, PRIMER, Clear Coats, Tools and Accessories and more, you can check them out at the following link~
(Death Stranding, Higgs Monaghan, and the original Chiarlium Mask 3D models are copyrighted to Kojima Productions, 505 Games, and Sony Interactive Entertainment America & Japan)