
First Look and Kit Review:
Yokomo Master Speed BD12 Review & Developer's Comments

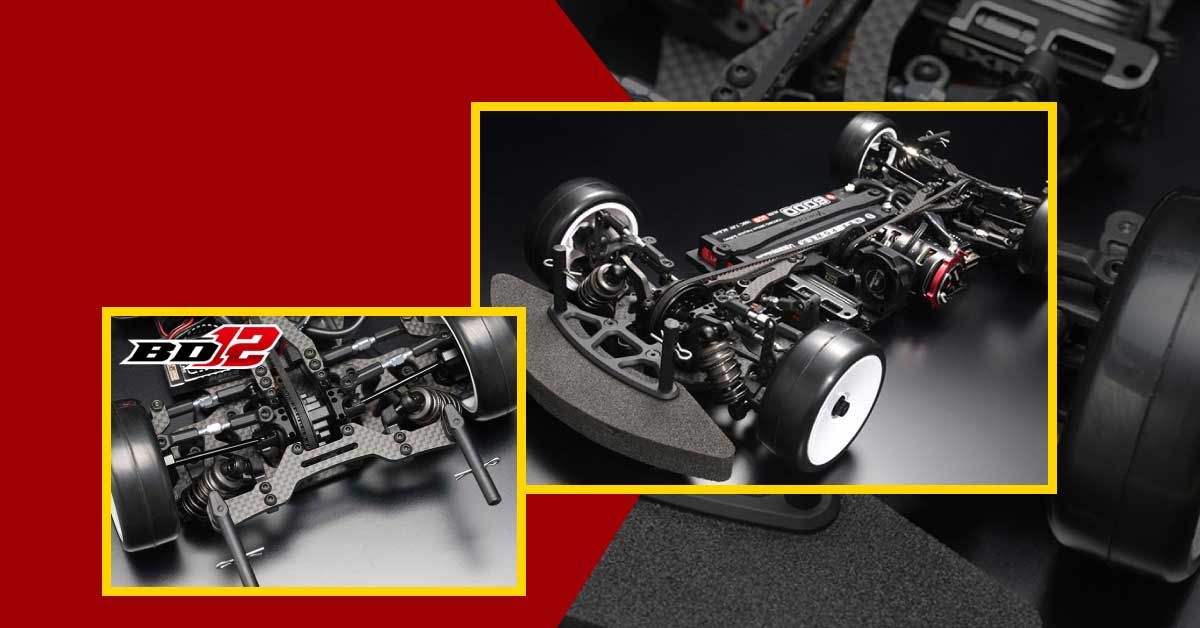
Let us have a look at the brand new offering from Yokomo, the Master Speed BD12! This much-anticipated predecessor of the BD11 1/10 touring car is expected to be nothing less than extraordinary.
Summary
- The Yokomo Master Speed BD12
- The Developer’s Comments & Tips
- The Review
- Watch the Unboxing and Review
The Yokomo Master Speed BD12
The Master Speed BD12 is the brand new addition to Yokomo’s arsenal, with its highly creative design, the “BD12” is the latest evolution of Yokomo’s famed touring cars. Its innovative design achieved a lowered center of gravity while maintaining the same balance and pitching roll as before. This upgrade is expected to lead the racing scene in the 2023-2024 series. Look forward to a smooth linear operation while conquering sharp corners with ease with the Yokomo Master Speed BD12 1/10 Competition EP Touring Car!
The Developer’s Comments & Tips
Naoya Kitagawa, one of the personnels in charge of the development of the BD12 had this to say about Yokomo’s new machine. He also shared some tips on how to adjust each part of the chassis.
Features of the BD12
The main difference of the BD12 model from the BD11 is around the center motor mount. It has a separate upper deck and a 90 spur gear teeth that allows the mounting shaft to be lowered by 3.5 mm to have a lower center of gravity. The BD12’s oil damper and installation method is also different from BD11. Its damper case is shortened by 0.5 mm and the upper cap is also lowered to shorten the total damper by 2 mm, to compensate for this the damper stays are set low.
Conventional front damper stays have 3 adjustment points, but BD12 has increased to 5 adjustment points. Its rear damper stays are mounted on body-mounted stays. The damper angle can be freely changed by the amount of spacer and has spring retainers with integrated ball bearings. When the damper contracts, the spring contracts with a slight twist, which is eliminated by inserting a bearing. This addition is expected to improve the grip feeling.
Key Points of Assembly
For ideal results, it is best to assemble the BD12 according to the instruction manual. Its standard values for alignment are 1.5 degrees front camber, 2.5 degrees rear camber, 3.5 degrees rear toe angle (toe-in), and 1 degree toe-out front. Adjust downstops so that the amount of rebound extends, 1.5 to 2 mm relative to vehicle height along with asphalt and carpet.
The BD12 is basically a spring and other specifications focused on asphalt courses. In addition to the 6-hole piston as standard equipment, the spring has been changed from the BD11’s specifications, not to worry though because it is still capable of running in carpeted courses. The main chassis has a new center-mounting mechanism and increased rigidity so it can handle asphalt and carpet.
The stabilizer has also been adjusted, however this adjustment is not for eliminating rattling but to make it easier to drive with slight rattling. If you make severe adjustments to eliminate rattles, this will affect the car’s performance poorly and there is a possibility that it will not run if the road surface conditions change slightly. It is easier to secure a grip if it is left to move slightly out to the left or right.
How to Efficiently Replace the Stabilizers
- First, remove the stabilizer holder.
- Then, loosen the set screws at the end of the stabilizer and shift the stabilizer holder back.
- Remove the stabilizer holder on one side and slide it out sideways.
- Thread the stabilizer holder through the stabilizer to determine the position of the O-ring to some extent.
- Slide the stabilizer holder forward in this state to fix the stabilizer holder to the chassis.
- The screws to secure the stabilizer holder should only be temporarily fastened, and the position of the O-ring should be fixed.
- Then, tighten the stabilizer holder
- Finally, install the stabilizer ends, tighten the set screws, and you are done!
How to Drill Holes in the Body on the Rear Side
- First, measure the width of the body mount. (The distance between the centers of the body mounts) For BD12 it is 106 mm. Drill holes based on this size.
- The body should be cut first according to the cut line, this cut line is the basis for determining the height of the body.
- Thinly mark the center of the cut body. To do so, mark the body mount at exactly half the width of the body. In this case, mark it at “53 mm” from the center section because the body was measured at 106 mm.
- For the height, the outer circumference of the “body mount patch” is on the lower side of the cut line. Apply the patch lightly so that it is placed in the center of the marked area.
- Then, check if the body mount patch and the body mount are aligned.
- Drill holes to match the hole diameter of the body mount patch to complete the process.
Why do you need a body mount patch?
The racing body is thin, but if you drill a hole with the body mount patch attached it prevents the reamer from going too deep.
The Review
The next evolution of 1/10 touring cars, the BD12, has 12 new parts. Its construction gave it a more centralized and lower CG. The spring retainer was also upgraded, it was integrated with ball bearings that will create a nice twisting movement in the shock. Its rear-diff components, however, are the same as the BD10’s and the BD11’s, so if you have training diffs from either of those models, you can carry them over to the BD12.
The main handling differences from this car however, are its lower center of gravity and flex characteristics. The BD11 was seen as too aggressive for some; it was quick-reacting and had a tendency to over-rotate in corners. The BD12’s developers channeled this aggressiveness instead of eliminating it, taking advantage of the older model’s "flaw" and reining it in with the upgrades instead of completely washing it out.
The BD12 is going to be an excellent car. Yokomo’s choice to evolve their design rather than give us a completely different car is a great move. We can carry over a lot of our race spares and parts from the older models. If you want it, do not miss out! Jump right into it! Otherwise, you will be left in the dust because models are already flying off the shelves.
Get the YOKOMO BD12 1/10 Competition EP Touring Car Kit here
Watch The Unboxing and Review
Join BJ, Brett, and our special guest Matt Jenkins as they unbox and review the Yokomo Master Speed BD12 Competition Touring Car!
What do you want us to unbox next? Feel free to message us with your ideas!
Also, make sure to follow us on Facebook, Instagram, Twitter, and Twitch!